If you want to generate a 22-character random alphanumeric password run the following in a terminal window:
LC_CTYPE=C LC_ALL=C tr -dc "a-zA-Z0-9-_\$\?" < /dev/urandom | head -c 22; echo
Leetspeak, also known as eleet, is a alphabet that is used mostly on the internet. It uses various combinations of ASCII characters to replace Latinate letters. e.g. 3l33t
If you want to generate a 22-character random alphanumeric password run the following in a terminal window:
LC_CTYPE=C LC_ALL=C tr -dc "a-zA-Z0-9-_\$\?" < /dev/urandom | head -c 22; echo
While the script is tried and tested, I would suggest you proceed with caution as it may break things. I have added caveats where to tread carefully in the steps below, so follow the process without fail. If you have an older computer and want to speed up Windows 11, this may help you a lot. But again, do it at your own risk.
1. First, press the Windows key once and type “powershell” in the Windows search bar. From the search results, click on the “Run as Administrator” option on the right pane.

2. Next, copy the below command and paste it into the PowerShell window. After that, hit Enter.
It will automatically clone the Windows debloater script and launch the program within a few seconds.
iwr -useb https://christitus.com/win | iex
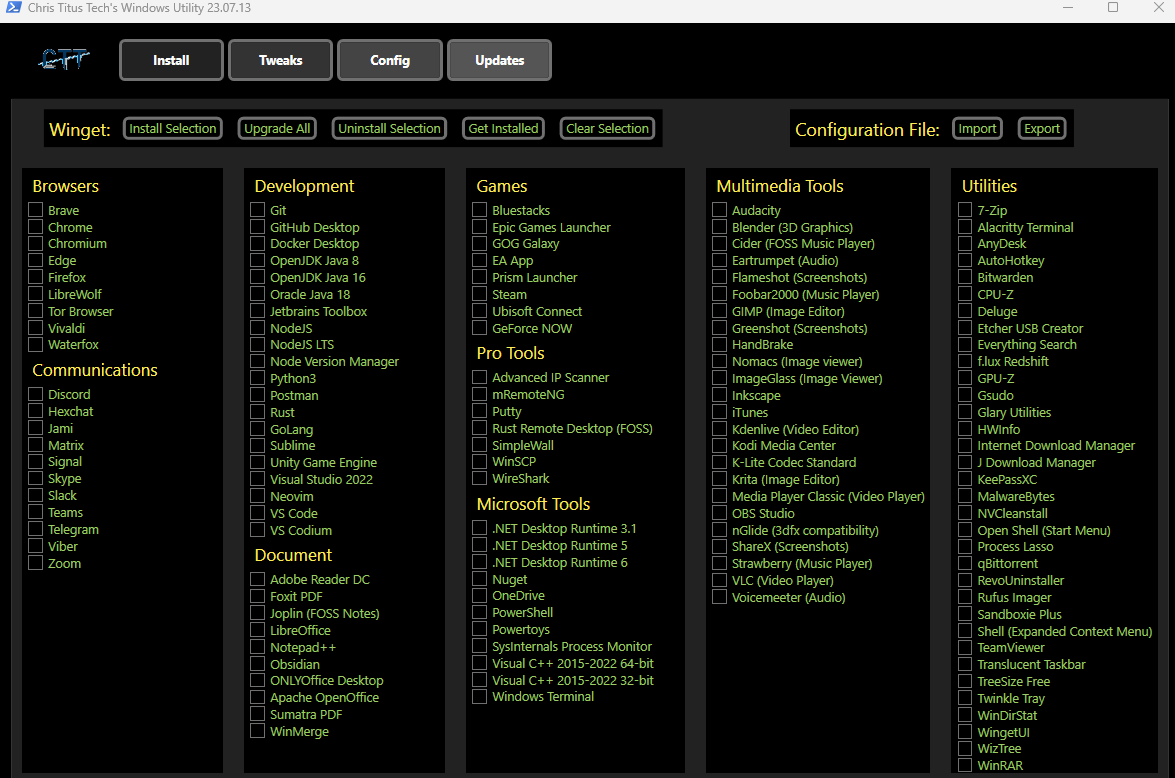
3. After executing the command, WindowsDebloater will open up, choose to your liking.

Here is some useful Powershell Commands for reports:
To install the latest public version of the module, run the following command
Set-ExecutionPolicy RemoteSigned
Install-Module -Name ExchangeOnlineManagementImport-Module ExchangeOnlineManagementConnect-ExchangeOnlineDisconnect-ExchangeOnlineGet-recipient -resultsize unlimited | select Name -expand emailaddresses > c:\emailadresses.txt
Get-Mailbox –ResultSize Unlimited | Get-MailboxStatistics | Sort-Object TotalItemSize -Descending | convertto-html DisplayName, LastLoggedOnUserAccount, LastLogonTime, TotalItemSize, ItemCount, @{label=”TotalItemSize(MB)”;expression={$_.TotalItemSize.Value.ToMB()}} | set-content c:\mailboxsizes.html
Get-Mailbox | Get-MailboxPermission | where {$_.user.tostring() -ne “NT AUTHORITY\SELF” -and $_.IsInherited -eq $false} | Select Identity,User,@{Name=’Access Rights’;Expression={[string]::join(‘, ‘, $_.AccessRights)}} | Export-Csv -NoTypeInformation c:\mailboxpermissions.csv
Here is some useful Powershell Commands for Database Management:
Get-Mailbox | Sort database, name | Format-Table name, database
1. Launch the Exchange Management Shell > Firstly lets get the names of my Databases, then I can simply copy and paste them into the move mailbox command.
Get-MailboxDatabase
Get-Mailbox -Database “Source Database Name” -ResultSize Unlimited | New-MoveRequest -TargetDatabase “Target Database Name”
2. The Mailbox moves should then be queued, depending on how many there are, this can take some time to complete.
3. To check on progress issue the following command;
4. When complete you should remove the movement requests like so;
5. That’s all the ‘user’ mailboxes, but your source database server may have system mailboxes in it. These will be either Arbitration mailboxes, or Archive Mailboxes (or both). I don’t have any archive mailboxes, but I do have Arbitration mailboxes. To find out for your databases, use the following commands;
Get-Mailbox -Database “Source Database Name” -Arbitration
Get-Mailbox -Database “Source Database Name” -Archive
6. To move Arbitration and Archive mailboxes, use the following commands;
Get-Mailbox -Database “Source Database Name” -Arbitration | New-MoveRequest -TargetDatabase “Target Database Name“
Get-Mailbox -Database “Source Database Name” -Archive | New-MoveRequest -TargetDatabase “Target Database Name“
7. Remove all Request
Get-MoveRequest -ResultSize Unlimited | Remove-MoveRequest -Confirm:$false
Here is some useful Powershell Commands for Export/Import:
New-ManagementRoleAssignment -Role “Mailbox Import Export” -User Administrator
New-MailboxImportRequest -Mailbox “Administrator” -FilePath “\\Exchange\Backup_PSTs\$($i.Alias).pst”
New-MailboxExportRequest -Mailbox administrator -FilePath “\\Exchange\Backup_PSTs\$($i.Alias).pst”
foreach ($i in (Get-Mailbox)) { New-MailboxExportRequest -Mailbox $i -FilePath “\\Exchange\Backup_PSTs\$($i.Alias).pst” }
foreach ($i in (Get-Mailbox -OrganizationalUnit “domain.dk”)) { New-MailboxExportRequest -Mailbox $i -FilePath “\\Exchange\Backup_PSTs\$($i.Alias).pst” }
Get-MailboxExportRequest | Get-MailboxExportRequestStatistics
Get–MailboxExportRequest -Status Completed | Remove-MailboxExportRequest
Get-Mailbox -ResultSize unlimited -Filter {(RecipientTypeDetails -eq ‘UserMailbox’) -and (Alias -ne ‘Admin’)} | Add-MailboxPermission -User Administrator@domain.dk -AccessRights fullaccess -InheritanceType all

A VPN or Virtual Private Network is used to securely tunnel the data from a local computer to a remote server. You can visualize VPN as a private network distributed across the internet or public network. Using VPN, different devices can securely talk to each other as if they are connected over a private network.
There are various VPN tunneling protocols are available. In this tutorial, we will configure a fresh VPS running Windows Server 2019 as an L2TP over IPSec VPN. L2TP or Layer 2 Tunneling Protocol is a tunneling protocol but it does not provide strong encryption. IPSec comes into picture here, which provides very strong encryption to data exchanged between the remote server and client machine.
We will leverage on Remote and Remote Access Services (RRAS) which provides easy to use interface to configure networking features such as VPN, NAT, Dial-Up Access server, Lan Routing, etc.
Search for Windows Powershell and open it in Administrative mode by right-clicking and selecting Open as Administrator.

Install Windows update module for Powershell by running the command.
Install-Module PSWindowsUpdate
You may be prompted for confirmation, press Y and enter all the time.
Now get the list of latest updates by running.
Get-WindowsUpdate
Finally, install the updates by running the command.
Install-WindowsUpdate

Once updates are installed, restart the computer by running the command.
Restart-Computer
Open Powershell again in administrative mode and run the following command to install the Remote Access feature with Direct Access and VPN (RAS) and Routing along with management tools.
Install-WindowsFeature RemoteAccess
Install-WindowsFeature DirectAccess-VPN -IncludeManagementTools
Install-WindowsFeature Routing -IncludeManagementTools

Open Server Manager and navigate to Tools >> Remote Access Management.

On the left pane, right-click on your local server and click Configure and Enable Routing and Remote Access.

In Configure and Enable Routing and Remote Access Wizard, select Custom Configuration radio button as we will manually configure the routing and access. Click Next button.

Next, select VPN access and click next to see a summary of the selection.
*NAT is needed if you have 1 NIC connected with Public wan ip

Finally, on clicking Finish button, you will see a prompt to start the Routing and Remote Access Services. Click on the Start Service button.

Now that we have our VPN running, let’s go ahead and configure it. Under the Routing and Remote Access window, on the left pane, right-click on your local server and click Properties.

Navigate to the security tab and click on Allow custom IPSec policy for L2TP/IKEv2 connection and put a very long PSK(Pre-shared key). You can use any tool to generate a random key.
Make sure to note down the PSK as we will need to share the PSK with every user who wants to connect to the VPN server.

Now, go to IPv4 tab and under IPv4 address assignment select static address pool. Click Add button and you will get a pop up to put IP address ranges. Put the starting address and ending address of the IP address range you want the users to assign to.

Click the OK button to save the address range and finally click OK to save the changes. You may get a warning saying you need to restart the Routing and Remote Access for changes to apply, you can safely click OK and ignore it for now as we will restart the service after completing next step.
On the left pane of Routing and Remote Access window, right-click on your local server and click on Restart under All Tasks.

This will restart the Routing and Remote Access services and all the changes we have made will be applied.
On the start menu, search for Windows defender firewall and open it. Click on Advanced settings on windows defender firewall.

Under Advanced setting, click on Inbound Rules on the left pane and then click on New Rule on right side pane.

Windows Server 2019 has predefined rules which we need to enable for VPN to work. In New Inbound Rule Wizard click on Predefined radio button and select the Routing and Remote Access from the drop-down.

Under Predefined Rules select Routing and Remote Access(L2TP-In) checkbox and click Next.

Under Action select, the option Allow the connection and click Finish.

The firewall is now configured to allow inbound traffic on UDP port 1701.
On the Firewall facing the Internet you will need to open the ports for the traffic to pass through.
To allow L2TP w/ IPSec traffic, open UDP ports 500, 1701 & 4500
In the below image you will see an example from a pfSense firewall (the server which holds the Remote Access Role has the ip: 172.21.29.21

On your VPN users properties, navigate to Dial-in tab. Now, select Allow access option for Network Access Permissions setting. Click OK to save the properties.

Our L2TP/IPSec VPN server is now ready and can accept the connections.
Search for Remote Access Management Console in the start menu and open the console. You should see the status of the VPN. If you have followed the tutorial correctly, you will see all green checkmark on all services. You can also view the details of connected clients on this console.

Open Powershell and run the below commands which holds configuration.
(In the below command ” c6lWJ%MK=oiKfe” is the PreShared Key)
Add-VpnConnection -Name "NAME OF VPN" -ServerAddress "vpn.server.dk" -TunnelType "L2tp" -AuthenticationMethod MSChapv2 -UseWinlogonCredential -L2tpPsk c6lWJ%MK=oiKfe
New-ItemProperty -Path 'HKLM:\SYSTEM\CurrentControlSet\Services\PolicyAgent' -Name 'AssumeUDPEncapsulationContextOnSendRule' -Value "2" -PropertyType DWORD -Force
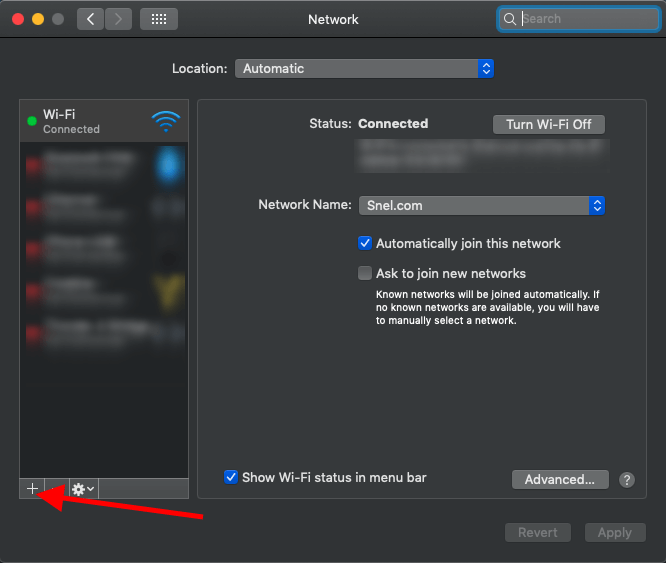
Click on the icon in the left top corner and click System Preferences

Click on Network

Click on + to add a new interface
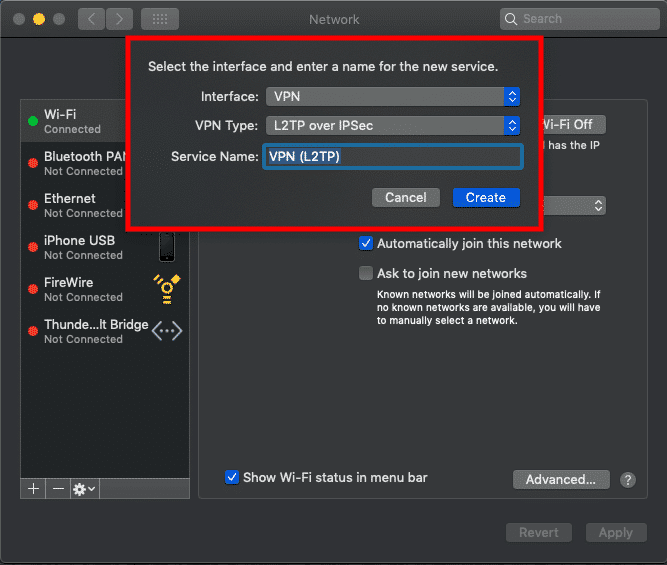
Select VPN via the Interface dropdown list. Select L2TP over IPsec as VPN-type.
Enter the VPN server information.
Once everything is entered/selected click Create
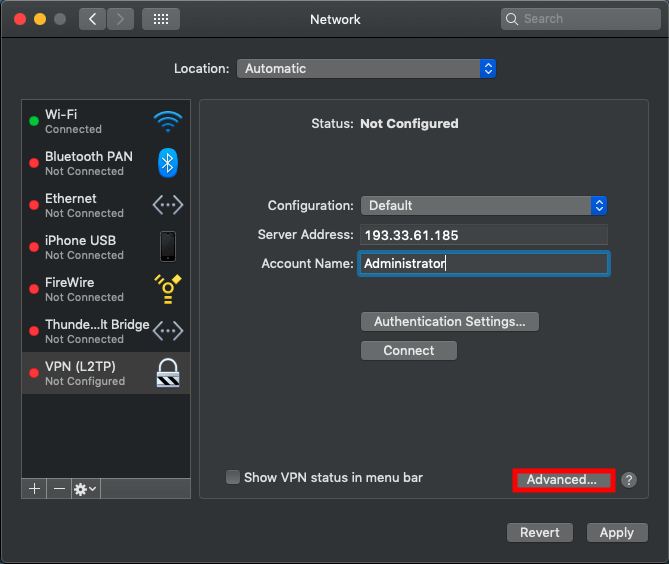
Select VPN (L2TP)in the left menu and enter your VPN information. In our tutorial, we use as example Server Address 193.33.61.185 and we are using Administrator as Account Name.
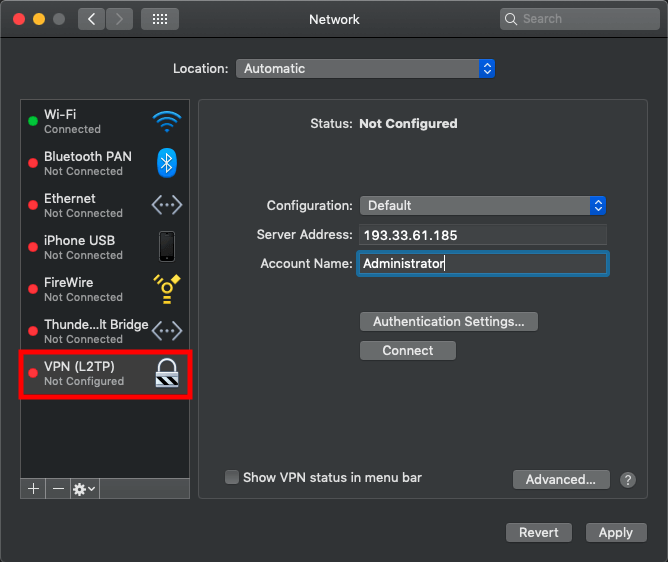
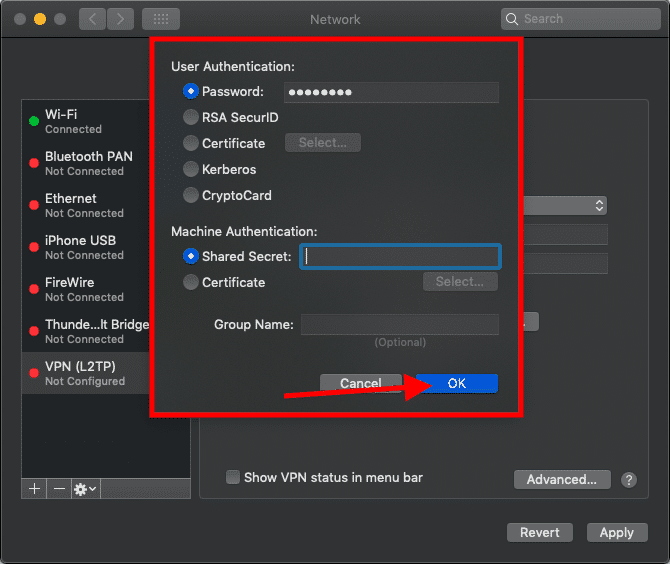
Click on Authentication Settings... and enter Password in the password field of your VPN user. In our article, it’s the password of the administrator user of our VPN server followed by the Shared Secret that you have entered in step 5 of this article as Preshared key and click on OK
Click on Advanced...
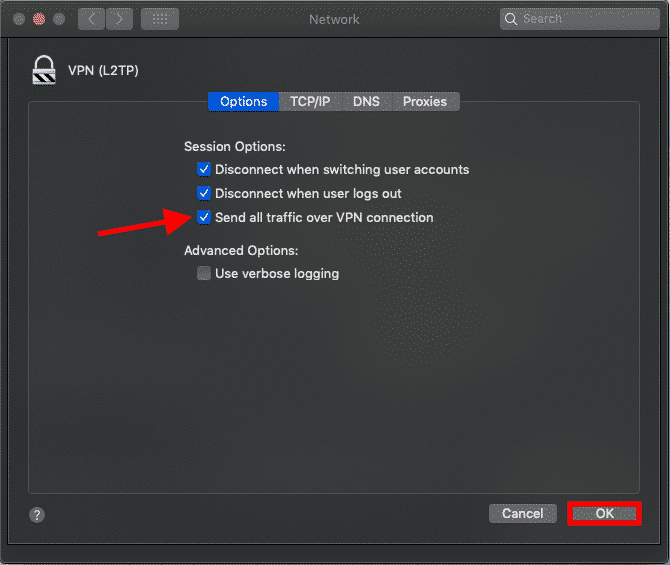
If your VPN server allows sending your traffic through the server, you can enable this to send all traffic over your VPN connection.
Select Send all traffic over VPN connection to send all traffic over the secure VPN connection.
The Mac OS X VPN client is now configured. Click on Connect to make a connection with your VPN server.
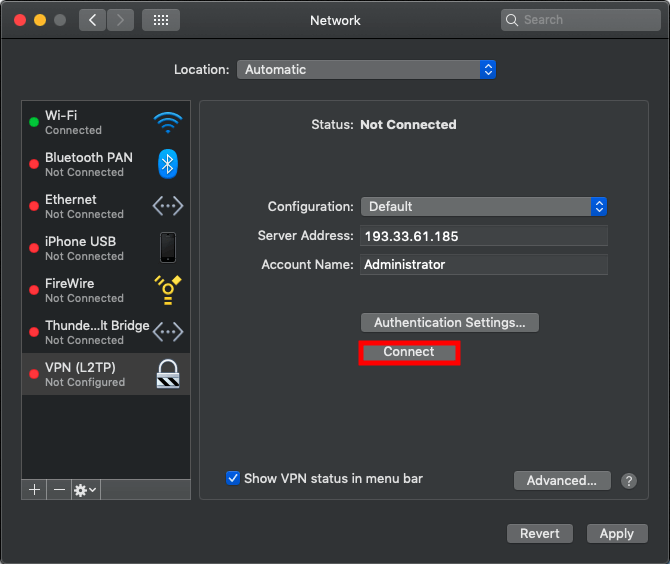
We have made a successful connection to our VPN server via VPN.
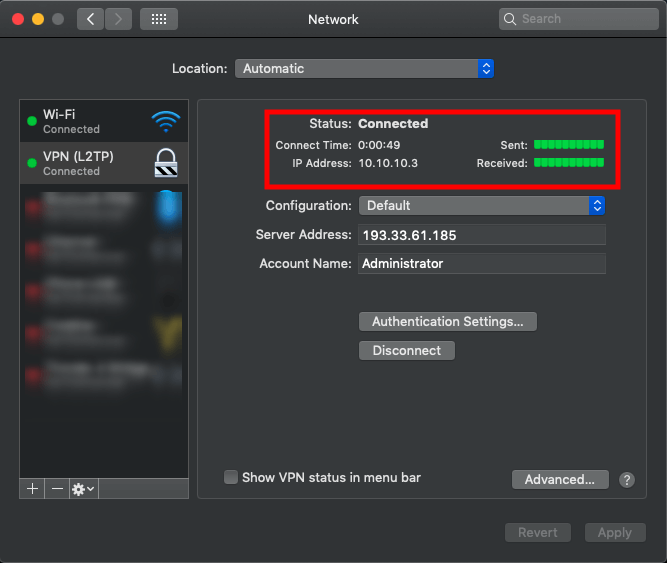
Congratulations, you have configured a VPN client on a Mac OS X.

Open Command Prompt as Administrator
Type
wmic product get name, version, vendor
and press Enter.
After a few moments, a list will be displayed in the command prompt detailing the programs installed on the target computer.
Type
wmic /output:%USERPROFILE%\DESKTOP\InstalledSoftware.html product get Name, Version /format:htable
and press Enter.
Echo Y|WMIC Product Where "Name='<INSERT PRODUCT NAME HERE>'" Call Uninstall
Programs installed with an .MSI are easy and has two choices:
If you still have access to the .MSI installation file you can simply run:
msiexec /x <PROGRAM NAME HERE>.msi /qIf you don’t have access to the .MSI installation file:
get-wmiobject Win32_Product | Sort-Object -Property Name |Format-Table IdentifyingNumber, Name, LocalPackage -AutoSizemsiexec /quiet /norestart /uninstall {<GUID>}like:
msiexec /quiet /norestart /uninstall {7FCA6452-46F2-452F-A5A7-DAB7DE12D0E6}$app = Get-WmiObject -Class Win32_Product -Filter "Name = '<PROGRAM NAME HERE>'"$app.Uninstall()
Make sure that the DC you are removing is not holding any of the FSMO Roles
i) On any health domain controller, click Start, click Run, type “Ntdsutil” in the Open box, and then click OK
ii) Type “roles“, and then press ENTER
iii) Type “connections“, and then press ENTER
iv) Type “connect to server <servername>“, where <servername> is the name of the server you want to use, and then press ENTER
v) Type “quit“, and then press ENTER
vi) Type “select operation target“, and then press ENTER
vii) Type “list roles for connected server“, and then press ENTER
viii) Review the listed roles and their host, if the DC that wish to remove is not listed proceed to step 4
If for what ever reason you can not do a clean transfer you will need to seize it
i) On any health domain controller, click Start, click Run, type “Ntdsutil” in the Open box, and then click OK
ii) Type “roles“, and then press ENTER
iii) Type “connections“, and then press ENTER
iv) Type “connect to server <servername>“, where <servername> is the name of the server you want to use, and then press ENTER
v) Type “quit“, and then press ENTER
vii) Type seize <role>, (where <role> is the role you want to seize)
viii) You will receive a warning window asking if you want to perform the seize. Click on Yes
Roles:
Naming Master
PDC
Schema Master
RID Master
Infrastructure Master
***Note***
Do not put the Infrastructure Master (IM) role on the same domain controller as the Global Catalog server. If the Infrastructure Master runs on a GC server it will stop updating object information because it does not contain any references to objects that it does not hold. This is because a GC server holds a partial replica of every object in the forest.
i) For the RID, PDC, and Infrastructure Master
1. Click Start, point to Programs, point to Administrative Tools, and then click Active Directory Users and Computers.
2. Right-click the icon next to Active Directory Users and Computers, and then click Connect to Domain Controller.NOTE: If you are not on the domain controller where you want to transfer the role ,you need to take this step. It is not necessary if you are connected to the domain controller whose role you want to transfer.
3. Click the domain controller which will be the new role holder, and then click OK.
4. Right-click Active Directory Users and Computers icon, and then click Operation Masters.
5. In the Change Operations Master dialog box, click the appropriate tab (RID, PDC, or Infrastructure) for the role you want to transfer.
6. Click Change in the Change Operations Master dialog box.
7. Click OK to confirm that you want to transfer the role.
8. Click OK.
9. Click Cancel to close the dialog box.
ii) For the Domain Naming Master role
1. Click Start, point to Programs, point to Administrative Tools, and then click Active Directory Domains and Trusts.
2. Right-click the Active Directory Domains and Trusts icon, and then click Connect to Domain Controller.NOTE: If you are not on the domain controller where you want to transfer the role ,you need to take this step. It is not necessary if you are connected to the domain controller whose role you want to transfer.
3. click the domain controller that will be the new role holder, and then click OK.
4. Right-click Active Directory Domains and Trusts, and then click Operation Masters.
5. In the Change Operations Master dialog box, click Change.
6. Click OK to confirm that you want to transfer the role.
7. Click OK.
8. Click Cancel to close the dialog box.
iii) For the Schema Master Role
1. Click Start, click run, type mmc, and then click OK.
2. On the Console, menu click Add/Remove Snap-in.
3. Click Add.
4. Click Active Directory Schema.
5. Click Add.
6. Click Close to close the Add Standalone Snap-in dialog box.
7. Click OK to add the snap-in to the console.
8. Right-click the Active Directory Schema icon, and then click Change Domain Controller.NOTE: If you are not on the domain controller where you want to transfer the role ,you need to take this step. It is not necessary if you are connected to the domain controller whose role you want to transfer.
9. Click Specify Domain Controller, type the name of the domain controller that will be the new role holder, and then click OK.
10. Right-click Active Directory Schema, and then click Operation Masters.
11. In the Change Schema Master dialog box, click Change.
12. Click OK.
13. Click OK .
14. Click Cancel to close the dialog box.
i) As a Domain Admin and in a command prompt type dcpromo /forceremoval
ii) If the force removal did not work pull the plug ( or shut down properly) and never every turn it back on while connected to the network
i) On any health domain controller, click Start, click Run, type “Ntdsutil” in the Open box, and then click OK
ii) Type “metadata cleanup“, and then press ENTER
iii) Type “connections“, and then press ENTER
iv) Type “connect to server <servername>“, where <servername> is the name of the server you want to use, and then press ENTER
v) Type “quit“, and then press ENTER
vi) Type “select operation target“, and then press ENTER
vii) Type “list domains“, and then press ENTER
viii) Type “select domain [n]”, [n] representing the domain, and then press ENTER
ix) Type “list sites“, and then press ENTER
x) Type “select site [n]”, [n] representing the site, and then press ENTERR
xi) Type “list servers in site“, and then press ENTER
xii) Type “select server [n]”, [n] representing the DC to be removed, and then press ENTERR
xiii) Type “quit“, and then press ENTER
xiv) Type “remove selected server“, and then press ENTER
i) In the DNS snap-in, right click domain.whatever and Properties
1. Click on Nameservers tab: remove server
ii) Repeat the above instructions for Reverse lookup and all zones
iii) Open up _msdcs and check all folders within for server name or ip reference
iv) Repeat the above step for _sites, and all others
v) Repeat the above steps for the Reverse Lookup Zones
Configure Primary Domain Controller to synchronize time with external NTP server (pool.ntp.org)
UDP port 123 must be open on firewall to allow NTP traffic in and out from this DC.
From DC command prompt type “telnet portquiz.net 123” to test if the port 123 traffic can go out.
If you have multiple domain controller and don’t know which DC holds PDC role then use following command:
netdom /query fsmo
w32tm /config /reliable:yes /syncfromflags:manual /manualpeerlist:"0.pool.ntp.org 1.pool.ntp.org 2.pool.ntp.org 3.pool.ntp.org"
net stop w32time; net start w32time
w32tm /config /syncfromflags:domhier /update
net stop w32time; w32tm /unregister; w32tm /register; net start w32time
Set-TimeZone cmdlet.Set-TimeZone -Id "Central European Standard Time"
Force synchronizing the time asap
w32tm /resync /nowait
w32tm /query /configuration
w32tm /query /status /verbose
Display time source
w32tm /query /peers
Display time between Domain Controllers
w32tm /monitor
Many administrators are familiar with SPF (Sender Policy Framework) as a system to declare and verify who can send emails from a domain. In the fight against spam and phishing, SPF is not enough anymore.
DKIM (DomainKeys Identified Mail) is an email authentication system based on asymmetric cryptographic keys. A sending email server signs the message body and/or headers with a private key. A receiving email server verifies the key signature, checking for changes in the message fields. The additional identity verification includes a data integrity component using the signature keys to ensure the original message is arriving intact.
Office 365 (O365), Exchange Online, DKIM
Administrators with domains on an Office 365 tenant already have an implicit DKIM signature applied to the tenant domain. The tenant domain is the “.onmicrosoft.com” domain, sometimes called the initial domain. Microsoft does this because it controls the DNS for onmicrosoft.com, publishing the public key and storing the private key on behalf of all subscribed tenants. The implicit signing is the basis of creating an explicit signature for your primary domain, the one without the onmicrosoft.com portion.
Depending on the DNS zone management tool being used, the steps below provide the data needed for adding the CNAME records.
You can also get your DKIM Records by connecting to Exchange Online via Powershell and running this command:Get-DkimSigningConfig -Identity <domain> | Format-List Selector1CNAME, Selector2CNAME
You’ve got your collection of Windows ISOs and maybe you’ve burned installation DVDs or flash drives for them. But why not make yourself a master installation drive that you can use to install any version of Windows?
Setting up a bootable USB Drive that includes multiple ISOs is actually pretty easy, We’re going to do it using a clever little free tool named WinSetupFromUSB, so go ahead and download the latest version of that. You can even include some non-windows ISOs on the disk, like Linux distributions and antivirus rescue disks. For a complete list of what you can include on your USB drive, check out their supported sources page. There is one important note from that page worth calling out. The tool works with single Windows ISOs from Microsoft. If you have a dual ISO that includes both the 32-bit and 64-bit versions of Windows, you won’t be able to use it. But you can always download single ISOs (one for 32-bit and one for 64-bit) and stick them both on the USB if you need to.
Next, make sure you have blank USB drive big enough to hold all the ISOs you want to install, along with a little extra space. A 16 GB drive should give you enough space for two or three versions of Windows. If you have a 32 GB drive, you should be able to fit all the versions of Windows you could want. If you want to include other ISOs as well, you might need a bigger drive.
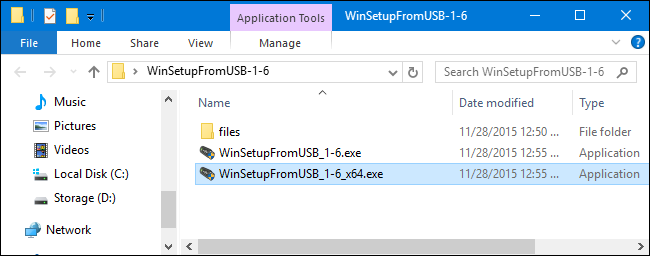
WinSetupFromUSB is a portable tool, so there’s no installation. Once you have it downloaded, double-click the archive to extract the files a new folder. If you’re running a 64-bit version of Windows, run the executable with “x64” in the name. If you’re running a 32-bit version of Windows, run the file without the “x64” in the name.
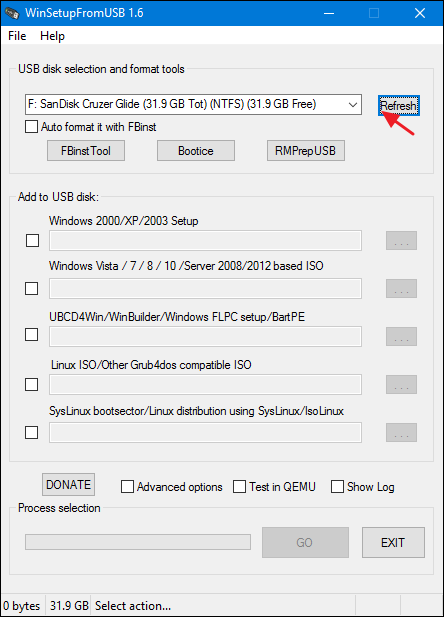
If you already had your USB drive inserted when you launched the tool, it should be listed in the box at the top of the window. If you didn’t have it inserted already, go ahead and plug it in now and then click Refresh.
Next, click the “Advanced Options” check box.

Instead of working like a regular check box, clicking it opens an “Advanced Options” dialog box. In the Advanced Options dialog, select the “Custom menu names for Vista/7/8/10/Server Source” check box. This setting allows you to provide your own names for the folders in which the Windows ISOs are stored and the boot menu names you see when you start a computer using the USB drive. You can close the “Advanced options” dialog when you’re done.

Now comes the somewhat tricky part. You’ll be adding Windows versions one at a time. The first time you add something to the USB drive (and only the first time), you’ll want to make sure that the “Auto format it with FBinst” check box is selected. This lets WinSetupFromUSB format the drive appropriately for booting. If you know you’ll be booting a computer in UEFI mode (or if you’re unsure), then select the “FAT32” option. Otherwise, you can use the “NTFS” option.
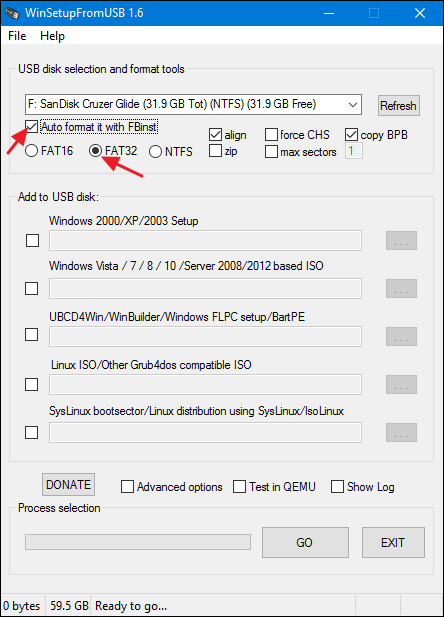
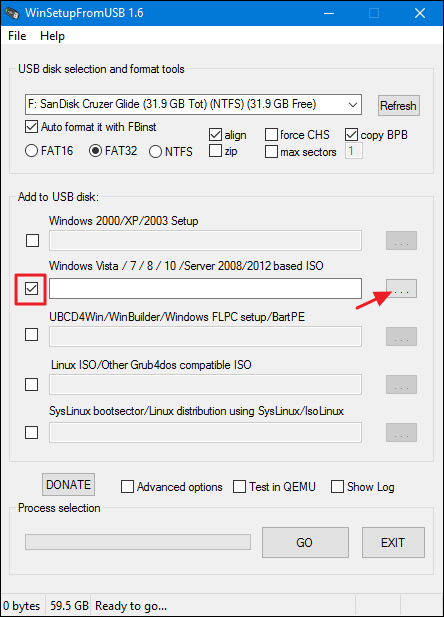
Next, select your first Windows ISO. Select the check box next to the “Windows Vista / 7 / 8 / 10 /Server 2008/2012 based ISO” section and then click the browse button (“…”) to its right. Locate and open the ISO you want to add.
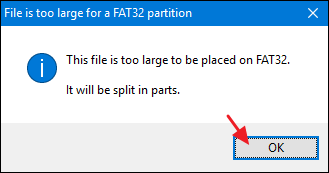
If it’s a large ISO and you’re using the FAT32 file system, you may get a notification that the file is too large and will be split in two. That’s fine, so go ahead and click OK.
Double-check that you have the correct USB drive selected at the top of the window and that the right ISO is shown in the box. Then, click “GO.”

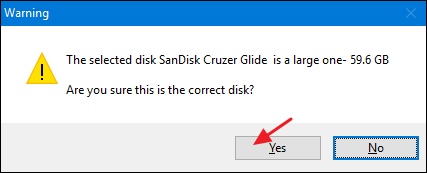
If you’re using a large USB drive, you may get a warning asking if you’re sure that’s the drive you want to use. Go ahead and click “Yes.”
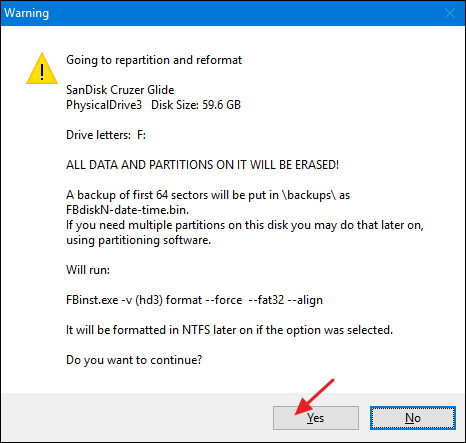
If the auto format option is enabled (and it should be for the first ISO you add to a disk), you’ll also get a warning letting you know that the drive will be formatted and anything on it will be erased. Click “Yes” to continue.
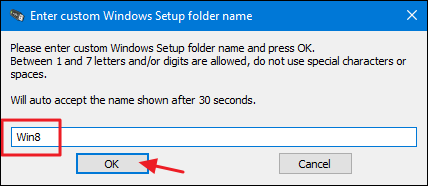
WinSetupFromUSB will now format the drive and then pop up a window where you can enter a custom folder name for the ISO that’s between 1 and 7 characters. If you don’t type anything for 30 seconds, the default will be used automatically.
A similar window will now open that lets you type a custom name that should appear in the boot menu. This time, the name can be between 5 and 35 characters, so you have a bit more room to be specific. And again, you have 30 seconds to type a new name before the default is used automatically.

At this point, WinSetupFromUSB will begin creating folders, adding the ISO to your USB drive, and adding the options to the boot menu. This can take several minutes and you can gauge the progress in the window’s status bar.

When WinSetupFromUSB is done, you’ll get a simple “Job done” confirmation window. Click “OK.”

WinSetupFromUSB now returns you to the main window. You can exit the program or you can continue adding additional ISOs to your boot disk. You’ll add additional ISOs using the same process, but there are a couple of things to keep in mind as you do it:
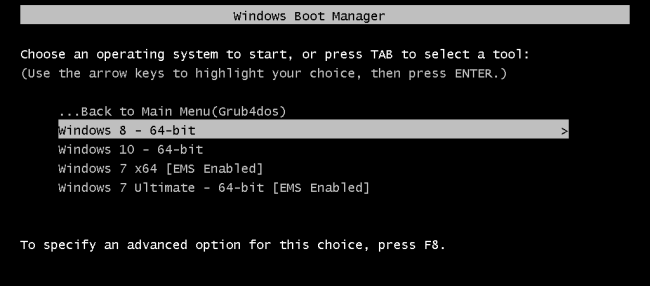
But that’s it. Otherwise, just follow the same steps each time you want to add a new ISO to the boot disk. You don’t have to add them all in one session either. You can come back any time and add something new. When you’re done, you can boot up a computer using your USB drive (which you may be able to do even if your BIOS won’t let you) and be rewarded with a nice boot menu like this:

While it doesn’t sport the most intuitive interface, WinSetupFromUSB is lightweight and works well. And once you get the hang of adding ISOs to the package, it’s a breeze to set yourself up with a powerful boot disk that will let you install whatever version of Windows you want, as well as a number of other bootable tools.

Drives.vbs
'Remove Drives

ON ERROR RESUME NEXT

DIM objNetwork,colDrives,i

SET objNetwork = CREATEOBJECT("Wscript.Network")

SET colDrives = objNetwork.EnumNetworkDrives

FOR i = 0 to colDrives.Count-1 Step 2
 ' Force Removal of network drive and remove from user profile
 ' objNetwork.RemoveNetworkDrive strName, [bForce], [bUpdateProfile]
 objNetwork.RemoveNetworkDrive colDrives.Item(i),TRUE,TRUE
NEXT

'Connect Drives

On Error Resume Next

Set objNetwork = CreateObject("WScript.Network")
Set objShell = CreateObject("Shell.Application")
brugernavn = objNetwork.UserName

' Attach Share
objNetwork.MapNetworkDrive "H:", "\\Server\Share", TRUE
objShell.NameSpace("H:").Self.Name = "Share"

' Attach User Share
objNetwork.MapNetworkDrive "U:", "\\Server\UserShare\" & brugernavn, TRUE
objShell.NameSpace("U:").Self.Name = brugernavn & "´s dokumenter"
Printers.vbs
Set objNetwork = CreateObject("WScript.Network")

on error resume next

objNetwork.AddWindowsPrinterConnection "\\Server\Printer1"
objNetwork.AddWindowsPrinterConnection "\\Server\Printer2"

objNetwork.RemovePrinterConnection "\\Server\Printer3"


objNetwork.SetDefaultPrinter "\\Server\Printer1"
FontInstall.vbs
Const FONTS = &H14&

Set objShell = CreateObject("Shell.Application")
Set objFolder = objShell.Namespace(FONTS)
objFolder.CopyHere "\\Server\Share\Fonts\HelveticaNeueLTStd-Cn.otf"