Set up L2TP/IPSec VPN on Windows Server 2019
Introduction
A VPN or Virtual Private Network is used to securely tunnel the data from a local computer to a remote server. You can visualize VPN as a private network distributed across the internet or public network. Using VPN, different devices can securely talk to each other as if they are connected over a private network.
There are various VPN tunneling protocols are available. In this tutorial, we will configure a fresh VPS running Windows Server 2019 as an L2TP over IPSec VPN. L2TP or Layer 2 Tunneling Protocol is a tunneling protocol but it does not provide strong encryption. IPSec comes into picture here, which provides very strong encryption to data exchanged between the remote server and client machine.
We will leverage on Remote and Remote Access Services (RRAS) which provides easy to use interface to configure networking features such as VPN, NAT, Dial-Up Access server, Lan Routing, etc.
Prerequisites
- Cloud VPS or Dedicated Server with Windows Server 2019 installed.
- You must be logged in via Remote Desktop Protocol as an administrative user.
Step 1: Update System
Search for Windows Powershell and open it in Administrative mode by right-clicking and selecting Open as Administrator.

Install Windows update module for Powershell by running the command.
Install-Module PSWindowsUpdate
You may be prompted for confirmation, press Y and enter all the time.
Now get the list of latest updates by running.
Get-WindowsUpdate
Finally, install the updates by running the command.
Install-WindowsUpdate

Once updates are installed, restart the computer by running the command.
Restart-Computer
Step 2: Install Remote Access Role
Open Powershell again in administrative mode and run the following command to install the Remote Access feature with Direct Access and VPN (RAS) and Routing along with management tools.
Install-WindowsFeature RemoteAccess
Install-WindowsFeature DirectAccess-VPN -IncludeManagementTools
Install-WindowsFeature Routing -IncludeManagementTools

Step 3: Configure Routing and Remote Access
Open Server Manager and navigate to Tools >> Remote Access Management.

On the left pane, right-click on your local server and click Configure and Enable Routing and Remote Access.

In Configure and Enable Routing and Remote Access Wizard, select Custom Configuration radio button as we will manually configure the routing and access. Click Next button.

Next, select VPN access and click next to see a summary of the selection.
*NAT is needed if you have 1 NIC connected with Public wan ip

Finally, on clicking Finish button, you will see a prompt to start the Routing and Remote Access Services. Click on the Start Service button.

Step 4: Configure VPN Properties
Now that we have our VPN running, let’s go ahead and configure it. Under the Routing and Remote Access window, on the left pane, right-click on your local server and click Properties.

Navigate to the security tab and click on Allow custom IPSec policy for L2TP/IKEv2 connection and put a very long PSK(Pre-shared key). You can use any tool to generate a random key.
Make sure to note down the PSK as we will need to share the PSK with every user who wants to connect to the VPN server.

Now, go to IPv4 tab and under IPv4 address assignment select static address pool. Click Add button and you will get a pop up to put IP address ranges. Put the starting address and ending address of the IP address range you want the users to assign to.

Click the OK button to save the address range and finally click OK to save the changes. You may get a warning saying you need to restart the Routing and Remote Access for changes to apply, you can safely click OK and ignore it for now as we will restart the service after completing next step.
Step 5: Restart Routing and Remote Access
On the left pane of Routing and Remote Access window, right-click on your local server and click on Restart under All Tasks.

This will restart the Routing and Remote Access services and all the changes we have made will be applied.
Step 6: Configure Windows Firewall
On the start menu, search for Windows defender firewall and open it. Click on Advanced settings on windows defender firewall.

Under Advanced setting, click on Inbound Rules on the left pane and then click on New Rule on right side pane.

Windows Server 2019 has predefined rules which we need to enable for VPN to work. In New Inbound Rule Wizard click on Predefined radio button and select the Routing and Remote Access from the drop-down.

Under Predefined Rules select Routing and Remote Access(L2TP-In) checkbox and click Next.

Under Action select, the option Allow the connection and click Finish.

The firewall is now configured to allow inbound traffic on UDP port 1701.
Step 7: Configure Internet Facing Firewall
On the Firewall facing the Internet you will need to open the ports for the traffic to pass through.
To allow L2TP w/ IPSec traffic, open UDP ports 500, 1701 & 4500
In the below image you will see an example from a pfSense firewall (the server which holds the Remote Access Role has the ip: 172.21.29.21

Step 8: Allow VPN User to Connect
On your VPN users properties, navigate to Dial-in tab. Now, select Allow access option for Network Access Permissions setting. Click OK to save the properties.

Our L2TP/IPSec VPN server is now ready and can accept the connections.
Step 9: Monitoring VPN
Search for Remote Access Management Console in the start menu and open the console. You should see the status of the VPN. If you have followed the tutorial correctly, you will see all green checkmark on all services. You can also view the details of connected clients on this console.

Tip: Deploy with Powershell
Open Powershell and run the below commands which holds configuration.
(In the below command ” c6lWJ%MK=oiKfe” is the PreShared Key)
Add-VpnConnection -Name "NAME OF VPN" -ServerAddress "vpn.server.dk" -TunnelType "L2tp" -AuthenticationMethod MSChapv2 -UseWinlogonCredential -L2tpPsk c6lWJ%MK=oiKfe
New-ItemProperty -Path 'HKLM:\SYSTEM\CurrentControlSet\Services\PolicyAgent' -Name 'AssumeUDPEncapsulationContextOnSendRule' -Value "2" -PropertyType DWORD -Force
Requirement: Add the necessary registry setting:
- Press the Windows Key and R at the same time to bring up the Run box.
- Type in: regedit and click OK. Click Yes if asked if you’d like to allow the app to make changes to your PC.
- In the left pane, locate and click the folder: HKEY_LOCAL_MACHINE\SYSTEM\CurrentControlSet\Services\PolicyAgent
- Click the Edit menu and hover your cursor over New. Click DWORD Value. A new registry will appear in the right pane, named New Value #1.
- Rename that file: AssumeUDPEncapsulationContextOnSendRule (this is case-sensitive and contains no spaces) and press ENTER.
- Right-click AssumeUDPEncapsulationContextOnSendRule, then click Modify.
- In the Value data box, type 2 and click OK.
- Reboot the computer.
Connect to L2TP/IPsec VPN FROM Mac
Prerequisites
- Mac OS X
- Access to your Mac OS X with admin or a user that has administrator permissions
Step 1 – Log in to Mac OS X
Click on the icon in the left top corner and click System Preferences

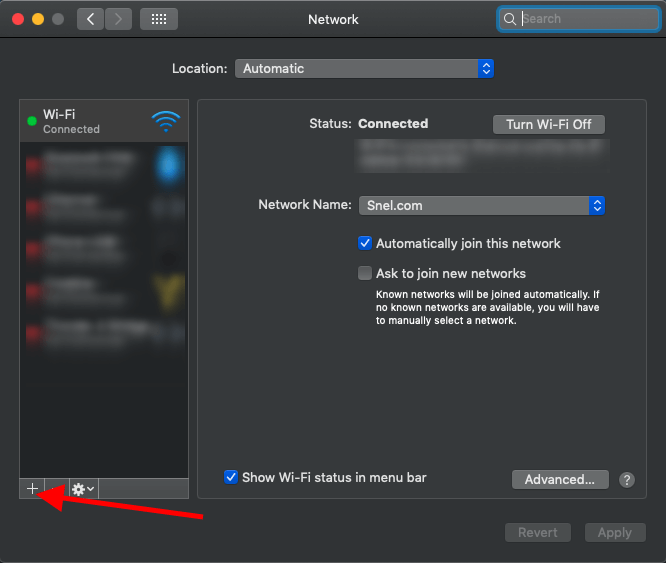
Click on Network

Click on + to add a new interface
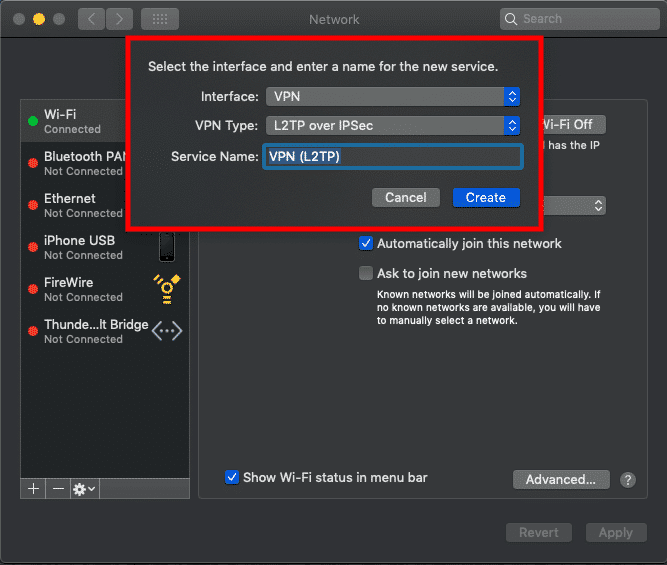
Select VPN via the Interface dropdown list. Select L2TP over IPsec as VPN-type.
Enter the VPN server information.
Once everything is entered/selected click Create
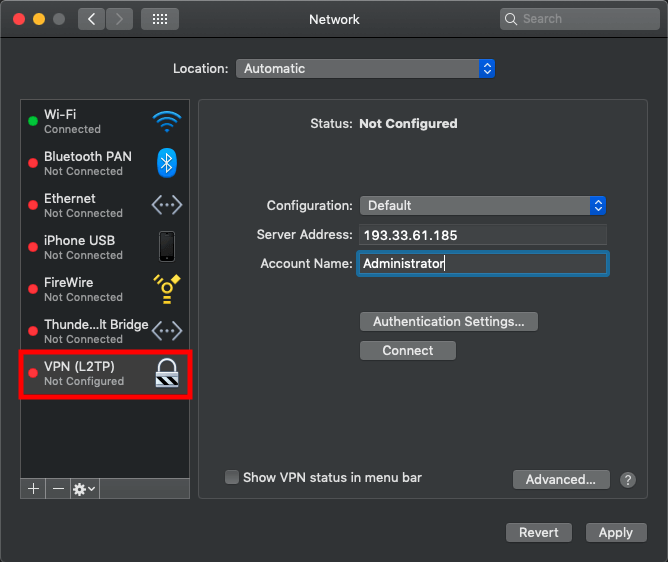
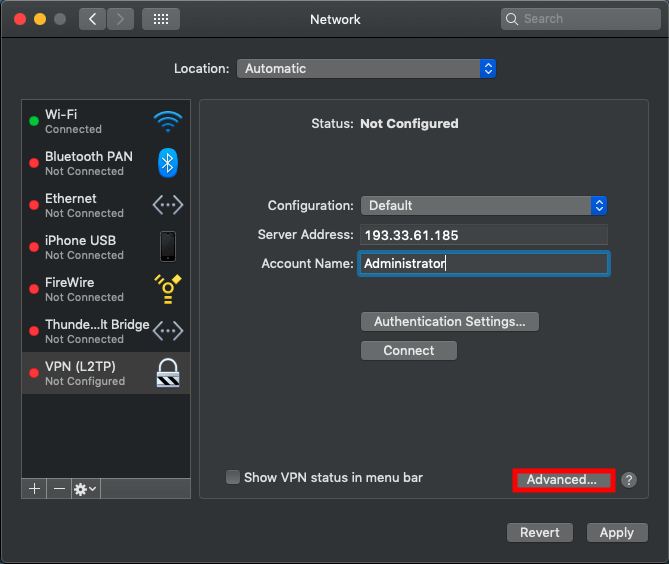
Select VPN (L2TP)in the left menu and enter your VPN information. In our tutorial, we use as example Server Address 193.33.61.185 and we are using Administrator as Account Name.
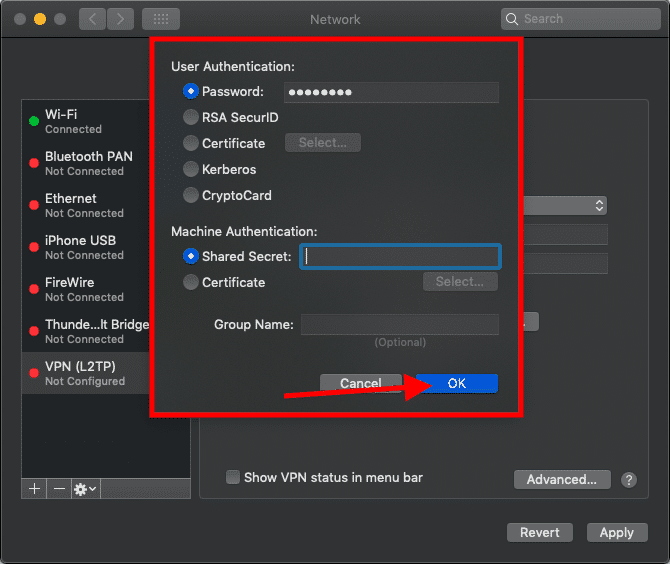
Click on Authentication Settings... and enter Password in the password field of your VPN user. In our article, it’s the password of the administrator user of our VPN server followed by the Shared Secret that you have entered in step 5 of this article as Preshared key and click on OK
Click on Advanced...
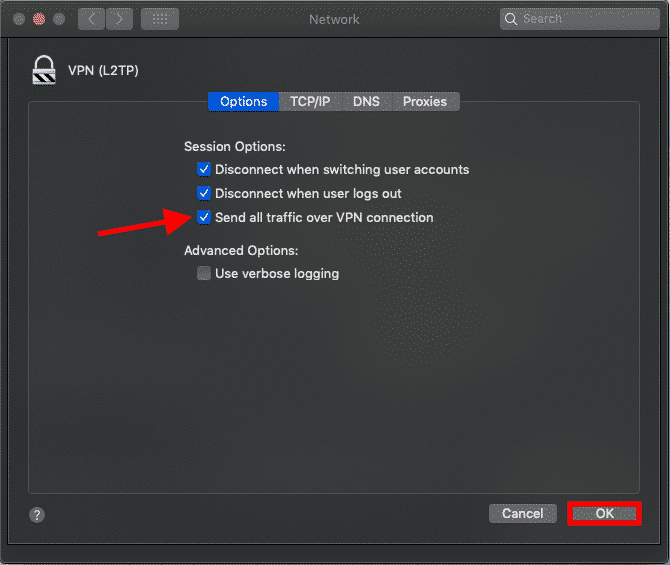
If your VPN server allows sending your traffic through the server, you can enable this to send all traffic over your VPN connection.
Select Send all traffic over VPN connection to send all traffic over the secure VPN connection.
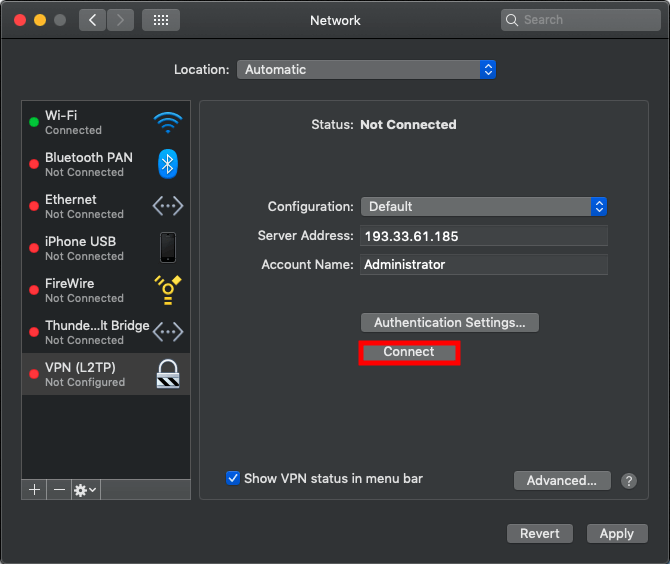
Step 2 – Connect with VPN
The Mac OS X VPN client is now configured. Click on Connect to make a connection with your VPN server.
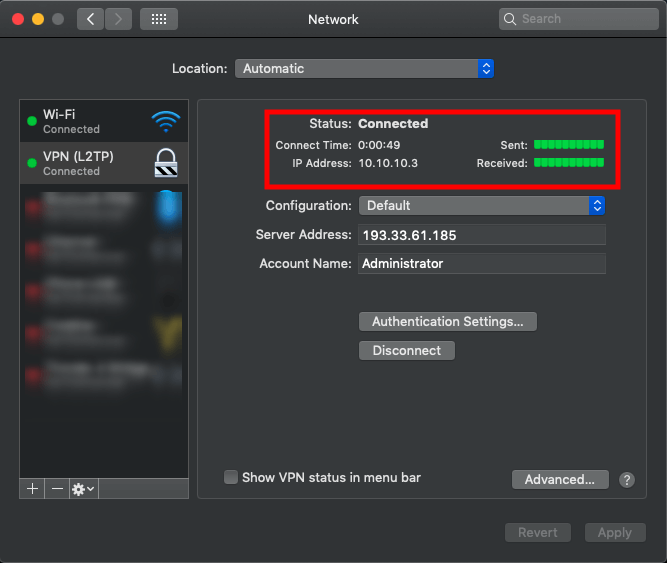
We have made a successful connection to our VPN server via VPN.
Conclusion
Congratulations, you have configured a VPN client on a Mac OS X.